Snowflake Destination
Update your warehouse allowlist for with new IP addresses
Starting on November 14, 2023 all warehouse customers who use allowlists in their US warehouses must update those lists to include the following ranges:
52.25.130.38/3234.223.203.0/28
Customers with warehouses in the EU must allowlist 3.251.148.96/29.
These updates coincide with reliability improvements to Segment's underlying warehouse architecture.
Snowflake is a data warehouse, built for the cloud, that delivers performance, simplicity, concurrency and affordability.
Getting started
There are six steps to get started using Snowflake with Segment.
- Create a virtual warehouse
- Create a database
- Create a role for Segment
- Create a user for Segment
- Test the user and credentials
- Connect Snowflake to Segment
Prerequisites
To set up the virtual warehouse, database, role, and user in Snowflake for Segment’s Snowflake destination, you must have the ACCOUNTADMIN role, or, a custom role with the following Snowflake privileges:
- CREATE WAREHOUSE: Used to create a Segment-specific virtual warehouses
- CREATE DATABASE: Used to create a Segment-specific database
- CREATE ROLE: Used to create the role that the Segment user assumes in your Snowflake instance
- CREATE USER: Used to create the Segment user in your Snowflake instance
To set up the Snowflake storage destination in Segment, you must have either a role in the Segment app of Workspace Owner or, for Business Tier users, Warehouse Destination Admin.
Step 1: Create a virtual warehouse
Segment’s Snowflake destination requires you to first create a Snowflake virtual warehouse.
To avoid conflicts with other operations in your cluster, Segment recommends that you create a new warehouse just for Segment loads. An X-Small warehouse is large enough for most Segment customers when they first create their Snowflake destination.
To create a new virtual warehouse, navigate to Warehouses > Create in Snowflake’s Classic Console or execute the following SQL command:
CREATE WAREHOUSE "SEGMENT_WAREHOUSE"
  WITH WAREHOUSE_SIZE = 'XSMALL'
    WAREHOUSE_TYPE = 'STANDARD'
    AUTO_SUSPEND = 600
    AUTO_RESUME = TRUE;
Set AUTO_SUSPEND to ~10 minutes in the UI (or 600 if using SQL) and enable AUTO_RESUME to avoid extra costs, as Snowflake uses per-second billing.
Step 2: Create a database
Segment recommends creating a new database just for Segment information, as the Segment Snowflake destination creates its own schemas and tables and could create name conflicts with your existing data.
To create a new database, execute the following SQL command:
CREATE DATABASE "SEGMENT_EVENTS";
Step 3: Create a role for Segment
You need to run these SQL commands rather than creating a role with the “Create Role” dialog in the Classic Console UI.
This role gives Segment just enough permission to load data into your database. Segment recommends that you don’t reuse this role for other operations.
- Click on Worksheets
- Select SEGMENT_EVENTS under database objects
- Change the role to
ACCOUNTADMIN - Create a new role by executing the following command:
CREATE ROLE "SEGMENT"; - Grant access to the virtual warehouse by executing the following SQL command:
GRANT USAGE ON WAREHOUSE "SEGMENT_WAREHOUSE" TO ROLE "SEGMENT"; - Grant access to the database by executing the following SQL command:
GRANT USAGE ON DATABASE "SEGMENT_EVENTS" TO ROLE "SEGMENT";
GRANT CREATE SCHEMA ON DATABASE "SEGMENT_EVENTS" TO ROLE "SEGMENT";
Step 4: Create a user for Segment
Create the user that Segment uses to connect to your warehouse. You can create a user that authenticates with a key pair, or you can create a user that authenticates using a password. For enhanced security, Segment recommends creating a user that authenticates with an encrypted key pair.
Key-pair authentication restricted to Business Tier users only
Users on other plans can authenticate with Snowflake using a username and password.
Create a user that authenticates with a key pair
If you are creating a user that will use a key pair to authenticate, you first must create a public key and then can create a new user.
Generate keys
To start, open a terminal window and generate a private key by running the following command, replacing key_name with the name you’d like to give the key. The command generates a private key in PEM format, and will prompt you to enter a passphrase. Write down or remember this passphrase, as you will need it when creating your Segment user and configuring your destination in the Segment app.
If you want to generate an unencrypted private key, append -nocrypt to the end of the command.
openssl genrsa 2048 | openssl pkcs8 -topk8 -v2 des3 -inform PEM -out key_name.p8
After you’ve created the private key, save the file to a local directory. You’ll need to upload the .p8 file to the Segment app when you create your Snowflake destination.
Next, generate your public key by running the following command, replacing key_name.p8 with the name of the private key that you previously created and public_key_name with the name of your new public key.
openssl rsa -in key_name.p8 -pubout -out public_key_name.pub
After you’ve created the public key, save the file to a local directory.
Generate a new user and assign the key to them
Now, create a new user by executing the following SQL command, replacing the public key value with the key you previously generated.
CREATE USER SEGMENT_USER
  DEFAULT_ROLE = SEGMENT
  RSA_PUBLIC_KEY = 'enter your public key';
GRANT ROLE "SEGMENT" TO USER "SEGMENT_USER";
Create a user that authenticates with a username and password
If you are creating a user that will use a username and password to authenticate, execute the following SQL command. Be sure to set a strong, unique password.
CREATE USER "SEGMENT_USER"
  MUST_CHANGE_PASSWORD = FALSE
  DEFAULT_ROLE = "SEGMENT"
  PASSWORD = "my_strong_password"; -- Do not use this password
GRANT ROLE "SEGMENT" TO USER "SEGMENT_USER";
Step 5: Test the user and credentials
Before you continue, test and validate the new user and credentials. After you verify the new credentials, you can connect Snowflake to Segment.
Test a key pair
Segment uses SnowSQL to run these verification steps. To install SnowSQL and verify your accounts:
- Download SnowSQL
- Open the Installer and follow instructions.
- When the installation is complete, run the following command, replacing “account”, “username”, and “path_to_the_rsa_key_encrypted.p8” with your Snowflake Account ID, username, and path to your private RSA key:
snowsql -a segment -u <username> -d <Database> -w <warehouse> --private-key-path <path_to_the_rsa_key_encrypted.p8>
For accounts outside the US, the account ID includes the region. You can find your account name from the browser address string.
For example, if your web address is https://myaccountname.snowflakecomputing.com/console#/internal/worksheet, your account name would be myaccountname.
Test a username and password
Segment uses SnowSQL to run these verification steps. To install SnowSQL and verify your accounts:
- Download SnowSQL
- Open the Installer and follow instructions.
- When the installation is complete, run the following command, replacing “account” and “user” with your Snowflake Account ID and username:
snowsql -a <account> -u <user>
For accounts outside the US, the account ID includes the region. You can find your account name from the browser address string.
For example, if your web address is https://myaccountname.snowflakecomputing.com/console#/internal/worksheet, your account name would be myaccountname.
You can also find part of your account name by running the following query on your worksheet in Snowflake:
SELECT CURRENT_ACCOUNT();
-
Enter password when prompted.
-
Run the following:
~$ snowsql --accountname myb10 --username SEGMENT_USER
Password:
* SnowSQL * v1.1.46
Type SQL statements or !help
SEGMENT_USER#(no warehouse)@(no database).(no schema)>SELECT 1;
+---+
| 1 |
|---|
| 1 |
+---+
1 Row(s) produced. Time Elapsed: 0.093s
SEGMENT_USER#(no warehouse)@(no database).(no schema)>USE WAREHOUSE "SEGMENT_WAREHOUSE";
+----------------------------------+
| status                           |
|----------------------------------|
| Statement executed successfully. |
+----------------------------------+
1 Row(s) produced. Time Elapsed: 0.118s
SEGMENT_USER#SEGMENT_WAREHOUSE@(no database).(no schema)>USE DATABASE "SEGMENT_EVENTS";
+----------------------------------+
| status                           |
|----------------------------------|
| Statement executed successfully. |
+----------------------------------+
1 Row(s) produced. Time Elapsed: 0.130s
SEGMENT_USER#SEGMENT_WAREHOUSE@SEGMENT_EVENTS.(no schema)>!exit
If you would like to use the web interface, switch to the new role for the Segment user, create a new Worksheet and execute:
SELECT 1;
USE WAREHOUSE "SEGMENT_WAREHOUSE";
USE DATABASE "SEGMENT_EVENTS";
Step 6: Connect Snowflake to Segment
After configuring your Snowflake resources, connect them to Segment.
- In the Segment App, select Add Destination.
- Search for and select “Snowflake”.
- Enter a name for your destination.
- Enter your Snowflake credentials as follows:
- Account: The account id of your cluster, not the url (for example, url:
my-business.snowflakecomputing.com, account-id:my-business. Note: If you are using Snowflake on AWS, the account id includes the region. For example, your url might be:my-business.us-east-1.snowflakecomputing.com/and your account-id would be:my-business.us-east-1) - Warehouse: The name of the warehouse that you created in Step 1: Create a virtual warehouse
- Database: The database name that you created in Step 2: Create database
- Username: The username that you created in Step 4: Create a user for Segment
- Authentication method: Select the authentication method that you used when creating a user in Step 4: Create a user for Segment. You can select either Key pair or Password.
- Account: The account id of your cluster, not the url (for example, url:
If you selected Key pair as your authentication method:
- Private key: Upload your private key (stored in .p8 format) that you created in Step 4: Create a user for Segment
- Passphrase (Optional) : If you created an encrypted key, enter the passphrase you created in Step 4: Create a user for Segment
Segment supports uploading one key at a time
Although you can create up to two keys in Snowflake, Segment only supports authenticating with one key at a time. To change the key that is in Segment, return to your Snowflake destination’s settings and upload a new key in the Private Key field.
If you selected Password as your authentication method:
- Password: The password that you set in Step 4: Create a user for Segment
Security
Allowlisting IPs
If you create a network policy with Snowflake and are located in the US, add 52.25.130.38/32 and 34.223.203.0/28 to the “Allowed IP Addresses” list.
If you create a network policy with Snowflake and are located in the EU, add 3.251.148.96/29 to your “Allowed IP Addresses” list.
Multi-Factor Authentication (MFA) & SSO
At this time, the Segment Snowflake destination is not compatible with Snowflake’s MFA or SSO settings. If your connected user has MFA or SSO enabled, you will need to disable it for syncs to run correctly.
Best Practices
Key pair authentication
Segment recommends that you authenticate with your Snowflake warehouse using an encrypted key pair. Key-pair authentication uses PKCS#8 private keys, which are typically exchanged in the PEM base64-encoded format.
Although you can create up to two keys in Snowflake, Segment only supports authenticating with one key at a time. To change the key that is in Segment, return to your Snowflake destination’s settings and upload a new key in the Private Key field.
Auto Suspend and Auto Resume
Set AUTO_SUSPEND to ~10 minutes in the UI (or 600 if using SQL) to minimize the credit consumption of Segment’s syncing process.
If you enable the AUTO_SUSPEND feature, Segment recommends that you also enable AUTO-RESUME. This will ensure that your Snowflake warehouse automatically resumes when Segment loads data. Otherwise, Segment will not be able to load data unless you manually resume your Snowflake warehouse.
Unique Warehouse, Database, and Role
Segment recommends creating a unique Warehouse, Database, and Role for the Segment Snowflake connection to your Snowflake instance to avoid conflicts with other operations happening in your cluster.
Troubleshooting
I get “Object does not exist” when running “USE DATABASE” or “USE WAREHOUSE”, even if the warehouse or the database are created.
Make sure you created the role and assigned the proper permissions with the account SYSADMIN or ACCOUNTADMIN. Other non-system accounts don’t assign the right permissions.
I’ve consumed all my credits after the initial sync.
If you have used all your credits, you must contact Snowflake to purchase more.
Also, make sure AUTO_SUSPEND is enabled and set to 5 or 10 minutes in the warehouse used by Segment. This setting helps avoid unintended use of credits by the Segment Snowflake destination.
My syncs are going slower than I expect.
This complaint is most often due to not using a separate Warehouse specifically for Segment.
If you’re already doing so, see this section of the Snowflake docs for more details on how to handle slow running processes.
FAQ
What size should I start with when creating a new Snowflake instance?
Most customers have the best luck starting with a X-Small instance.
Why do I see so many ‘Rollback’ statements?
A rollback is issued at the end of each session to make sure there’s no “in-flight” processes hanging out that could block other processes later.
Does Segment use transactions for loading data?
Segment doesn’t open transactions explicitly because that would lock resources. However, if autocommit is enabled, each statement functions as its own transaction, and a silent commit is issued after each.
What privileges do I need to grant?
You shouldn’t need to grant any additional privileges. However, you may need to confirm that the USAGE privilege on those schemas is granted to the same role granted to the user connecting to Snowflake through Databricks.
Run these statements in Snowflake UI or CLI, and check the output to verify the permissions.
SHOW GRANTS ON SCHEMA <schema_name>;Look in the output to see if USAGE privilege is granted to the role you’re using.SHOW GRANTS TO USER <username>;Replace “username” with the login ID, and verify the correct role is assigned to that login.
Also, if the user has more than one role, make sure the role you use when doing the data pull has USAGE for the schema - and not just the default role. If your organization uses role inheritance (for example, role apples is granted to role gravensteins), then make sure that the role is being assigned and inherited correctly.
Indexes
Queuing - you can use a different Warehouse for Segment, or use the recommendations from the Snowflake docs.
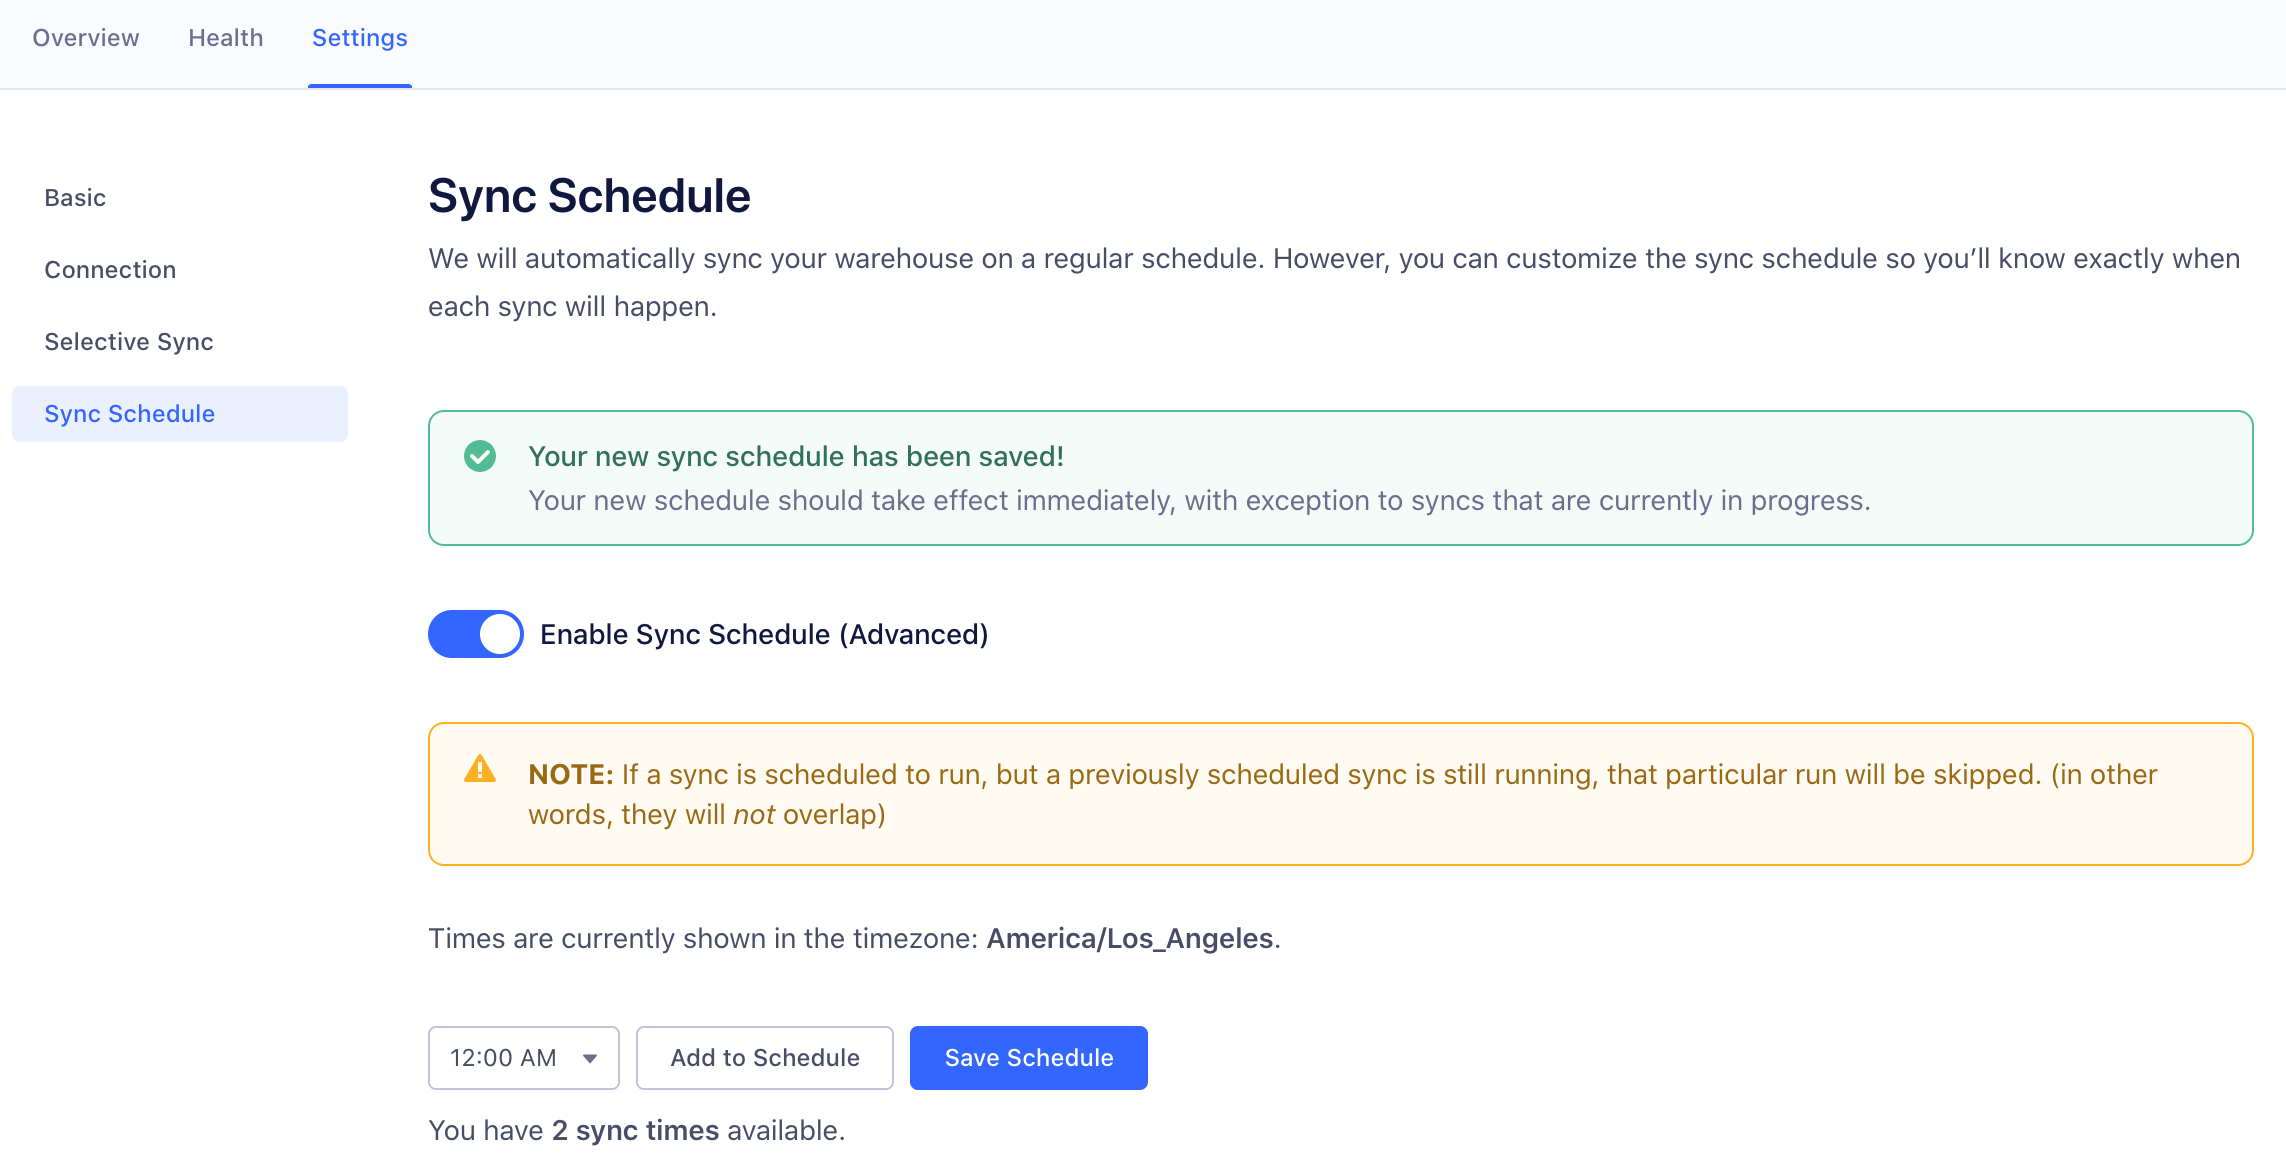
Can I customize my sync schedule?
Your data will be available in Warehouses between 24 and 48 hours from your first sync. Your warehouse then syncs once or twice a day depending on your Segment Plan.
Segment allows Business Tier (BT) customers to schedule the time and frequency of warehouse data syncs.
If you are on a BT plan, you can schedule warehouse syncs by going to Warehouse > Settings > Sync Schedule in the Segment web app. You can schedule up to the number of syncs allowed on your billing plan.
I’m encountering a “JWT token is invalid” error. What do I do?
For more information about troubleshooting a JWT token is invalid error, see Snowflake’s Key Pair Authentication: Troubleshooting documentation.
This page was last modified: 03 Jun 2024
Need support?
Questions? Problems? Need more info? Contact Segment Support for assistance!